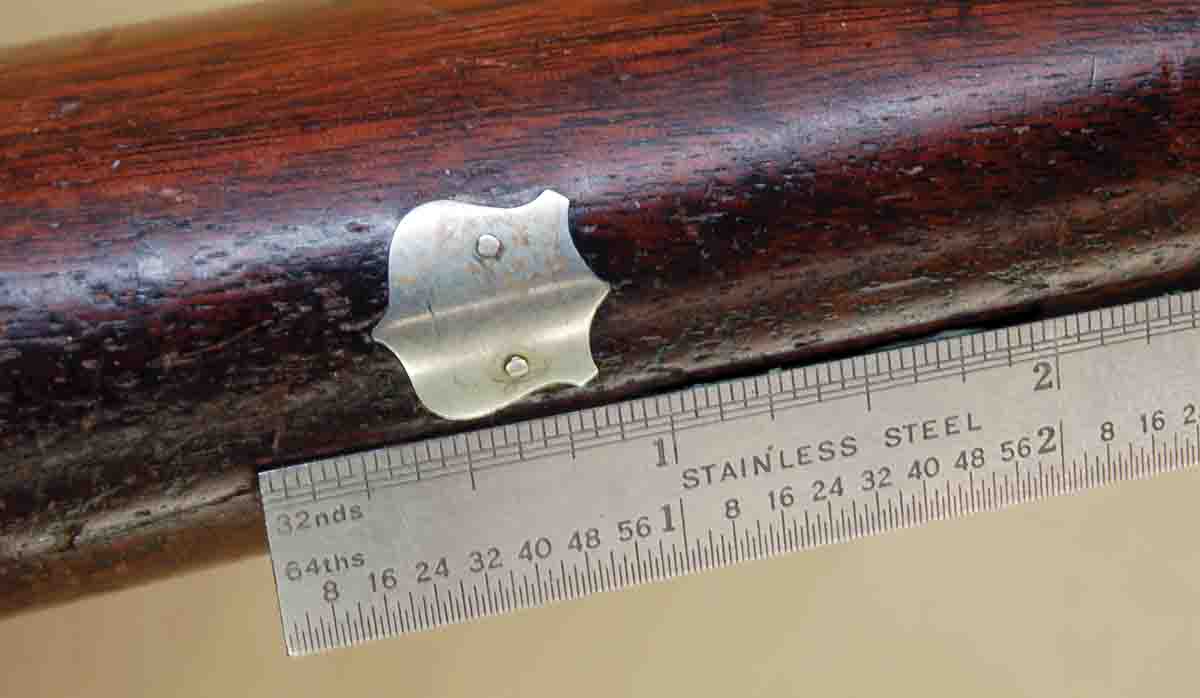
An initial shield in a Parker double is held in place by two tiny nails, which have worked loose.
One of my earliest childhood memories is going with my dad to visit a pistol-shooter friend of his named Pete. While they talked guns, I had the run of his shop – so long as I didn’t touch any machines! You see, this was a wood shop containing many ancient, rust-colored machines. Each one performed an operation producing a specific joint used in making solid hardwood furniture from locally-grown walnut, butternut and cherry trees. There was, however, other wooden objects in the shop of more interest.
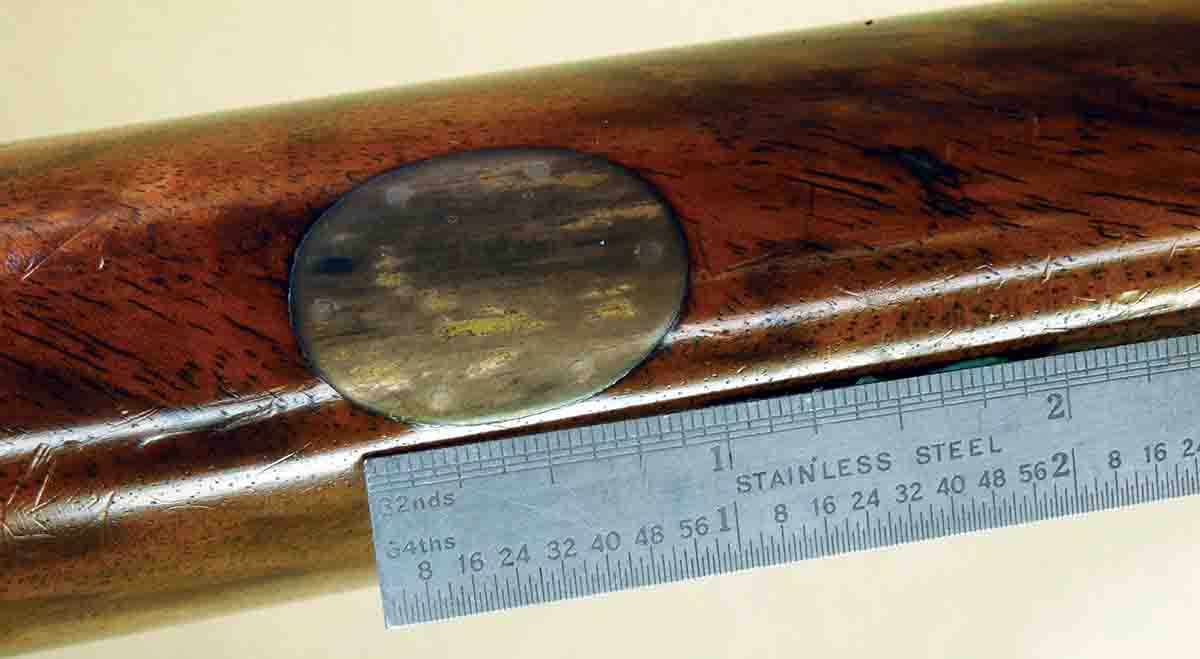
The large, unmarked oval in a double rifle may really be silver as indicated by the tarnished color.
In one corner was a large cabinet containing gunstocks being refinished. Most were hardware store single-shot sixguns and .22 rimfires. This time, there were two fancy-figured stocks with one having a small silver inlay in the bottom line of the stock between the grip cap and toe. I had seen stocks with such things pictured in American Rifleman and thought they were really neat, making the gun stand out even if the wood wasn’t highly figured.
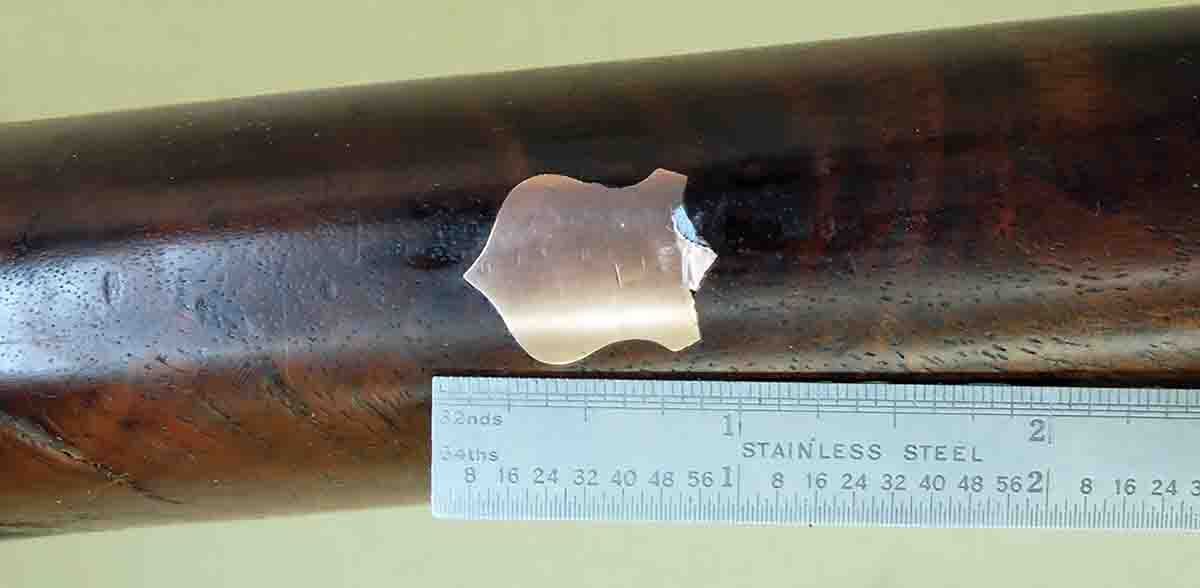
Someone tried to pry out the large, gold shield in an Ithaca 4E stock, thinking it was solid gold.
Some months later, dad and I were back at the woodshop when a customer came in with a Winchester M12 trap gun. He wanted the stock refinished and a “silver federal shield” inlet into the bottom of the stock. This was a surprise, never suspecting these attractive little decorations were made and installed here.
After the M12 owner left, I was quick to ask the purpose of the inlays and how they were made. Pete showed me his brass templates used to trace the inlay outline onto a white metal he simply called “silver.” He admitted, however, that he really didn’t know what purpose they served. Having refinished stocks, which had the little inlays engraved with a letter or two, Pete assumed they were the owners initials. He didn’t know why anyone would want their initials on a gunstock. Of all the inlays he had done over the years, no one had ever mentioned engraving anything on them – interesting.
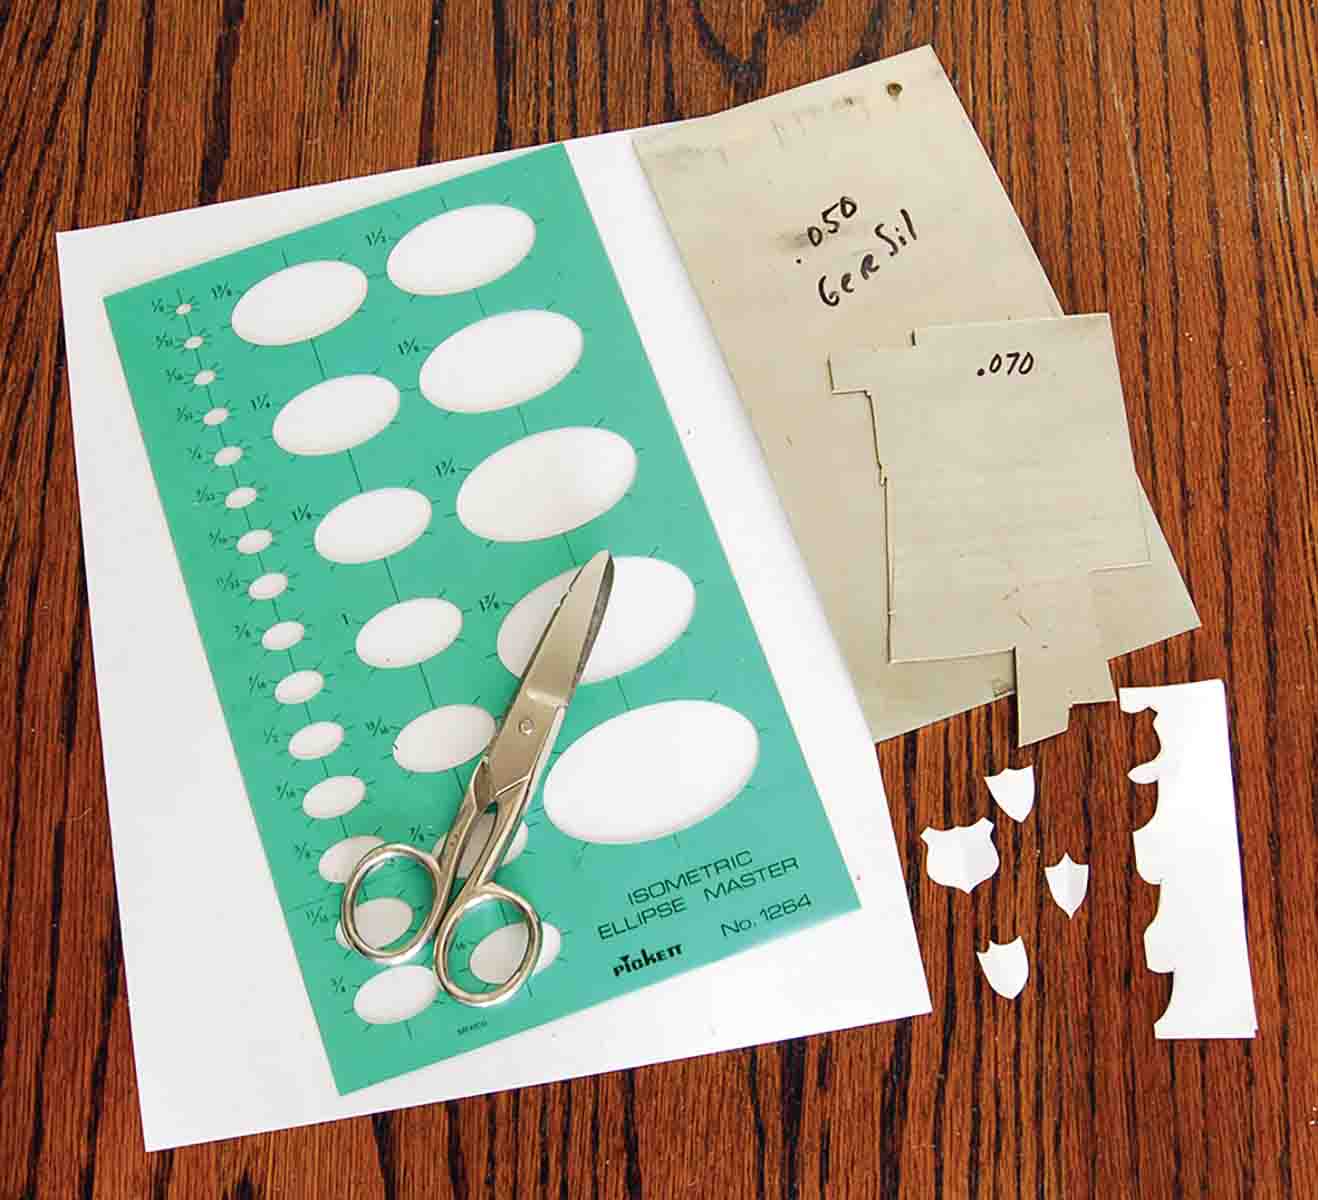
Initial shields can be drawn on paper and cut out or traced using an ellipse template.
It wasn’t until I began working as a trap boy that the mystery was solved. This was the 1950s and 1960s. Most folks shot a trap version of the Winchester M12, Remington M870 or Browning Over and Under. Each make and model looked exactly like its brothers. When several of the same gun were sitting on racks at a big shoot, it was hard to pick a specific one out of the crowd. Thus, the small silver inlays, some engraved with an initial or two.
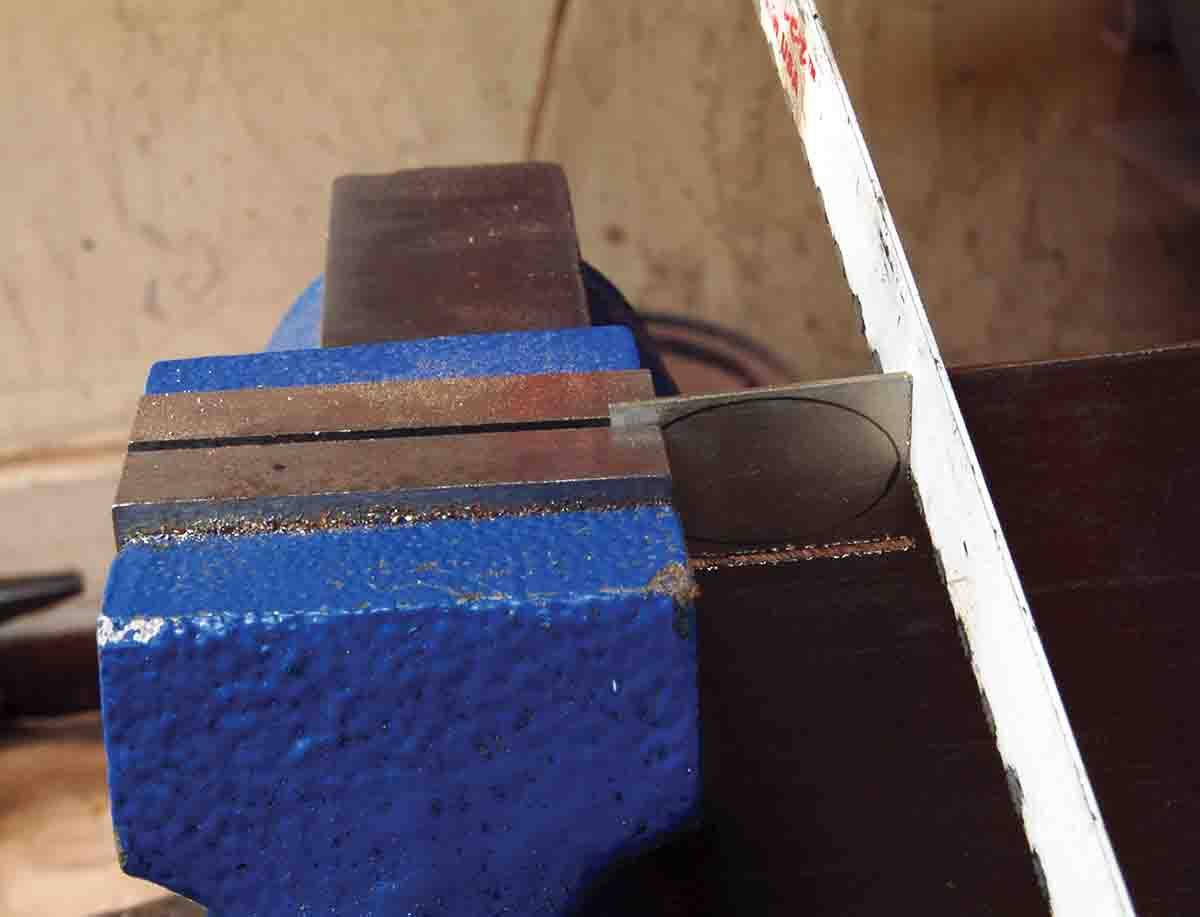
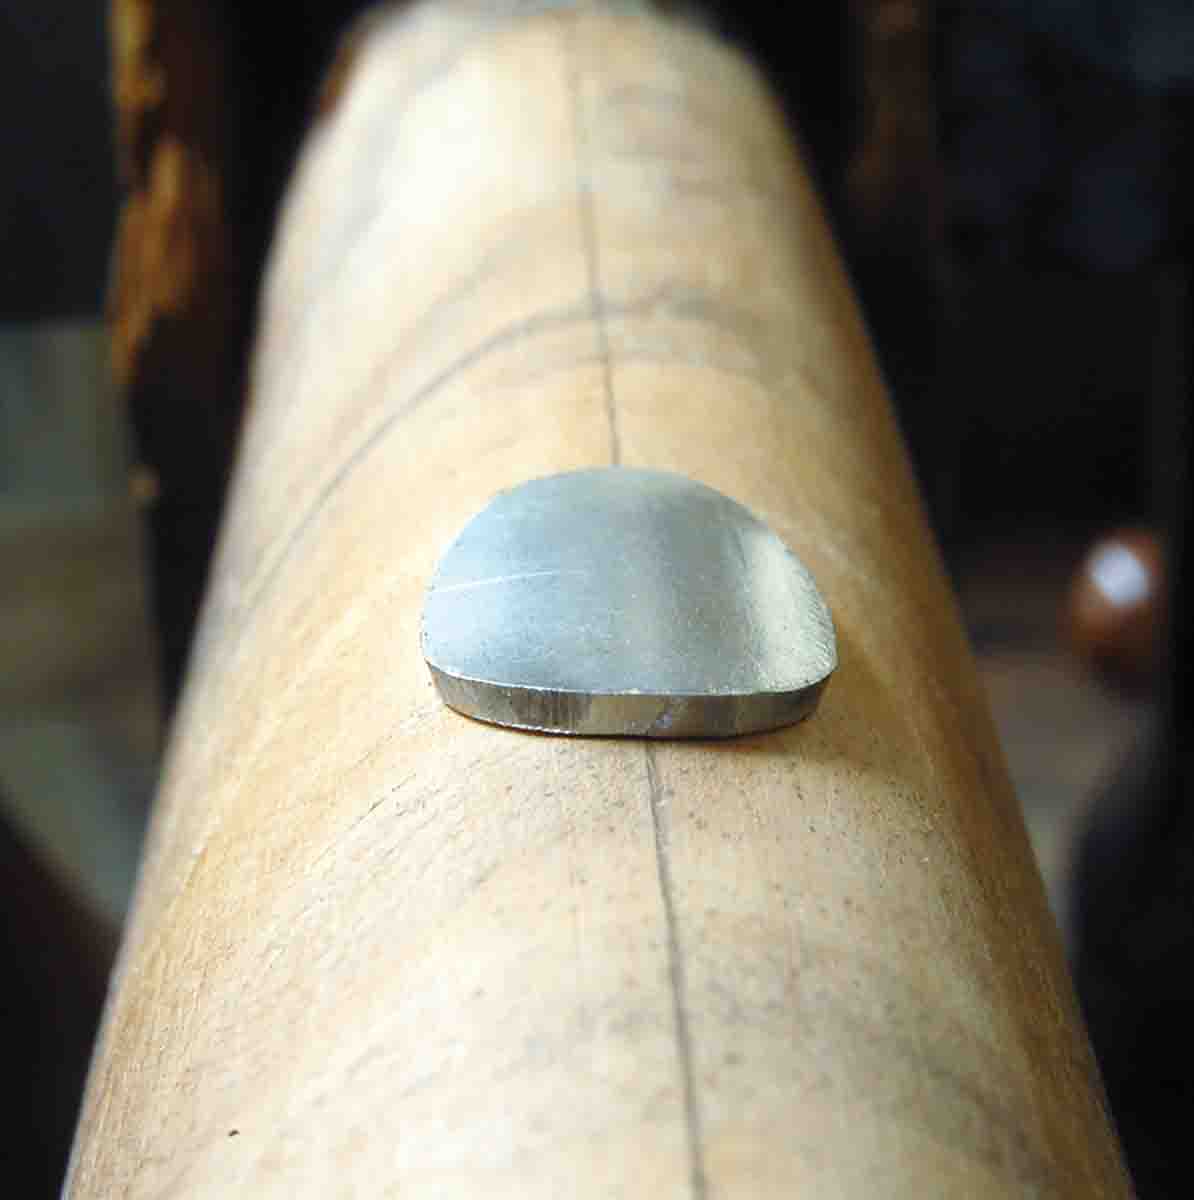
An ellipse is traced on a German silver sheet and cut out using a fine, 32-tooth hacksaw blade.
When I started shooting smallbore, there was somewhat the same problem picking a specific Winchester M52 or Remington M513-T. Here, decals stuck to the offside of the stock were popular. I only remember a couple of silver ovals, but there was one silhouette of a rooster, an acorn, an ordnance flaming bomb and an obviously female figure that probably wouldn’t pass inspection today!
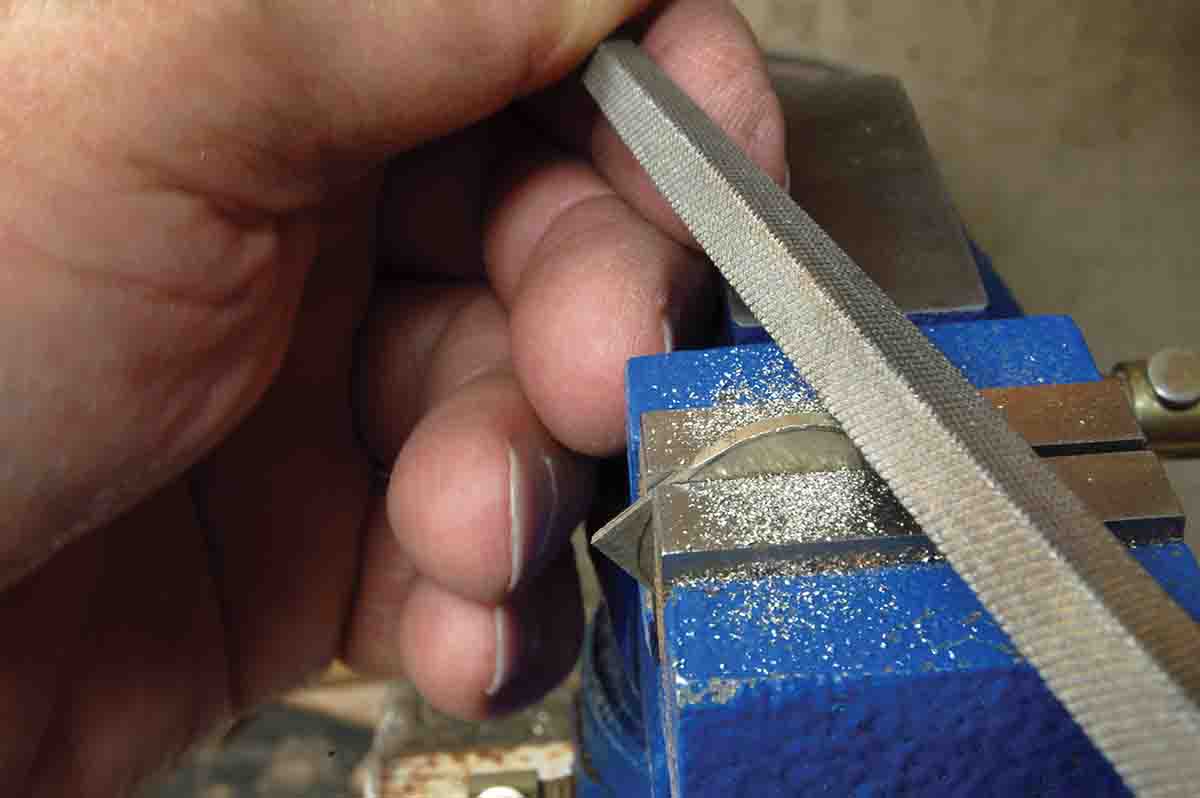
Next, file down to the pencil outline. This is easy because German silver is very soft like real silver.
At any rate, the oval (really an ellipse) looks the best if engraved with initials and kept small. Just under 1 inch long is good. The same applies to the various shield shapes. If highly visible initials are wanted, the ellipse can be a bit longer and wider.
Making and installing these inlays for quick identification or simply to add a touch of class to a favorite firearm is one of those projects that looks difficult, but is really quite easy for anyone who likes stock work. Inlay material is not silver, though it perhaps once was. For more than a hundred years, an alloy called “German silver,” consisting of copper, zinc and nickel has been preferred. It’s a bit whiter than silver and doesn’t tarnish. The material is available in small sheets from sources that sell muzzleloader building supplies. Thickness varies. The ellipse made here is cut from .050-inch metal. Shields or designs having narrow protrusions benefit from the thicker .075-inch metal.
The bottom of the stock is curbed so the inlay must be bent to fit. A simple jig to do this is shown.
The shape of the inlay can be a problem. Since the most common is the ellipse, it is easiest to just buy an ellipse template like the one shown in the photo. Available from art supply shops or arts and crafts stores, using the template makes selecting the proper size easy and a perfectly symmetrical shape is guaranteed. Shields are more difficult in that once a shape is decided, size must be determined. The tendency is to make them too large. Fold a piece of paper in half, draw one-half of the shield on it, cut it out, then open the fold. This solves the symmetry problem and if the shield doesn’t look quite right, make another!
Pipe, inlay and rod are taped together, then squeezed in a vise to bend the inlay.
The inlay shape is now traced on the German silver plate and cut out. Be careful here, as the metal is somewhat soft and easily bent. It’s best to cut around the inlay with a 32-tooth hacksaw blade as shown in the photo, then clamp it in a vise with smooth jaws for filing to shape. The blue vise shown has jaws only 1.5 inches wide, was purchased at Harbor Freight and is still available today. This column in Rifle No. 271 (November – December 2013) gives far more detail for anyone interested in what I consider the most useful holding device in the shop.
Now it’s time to make a hole to fit the inlay. However, note that the inlay is flat and the toe line of the stock is rounded. The inlay must be bent to fit the stock, but how?
After bending the inlay, it fits the curve of the stock.
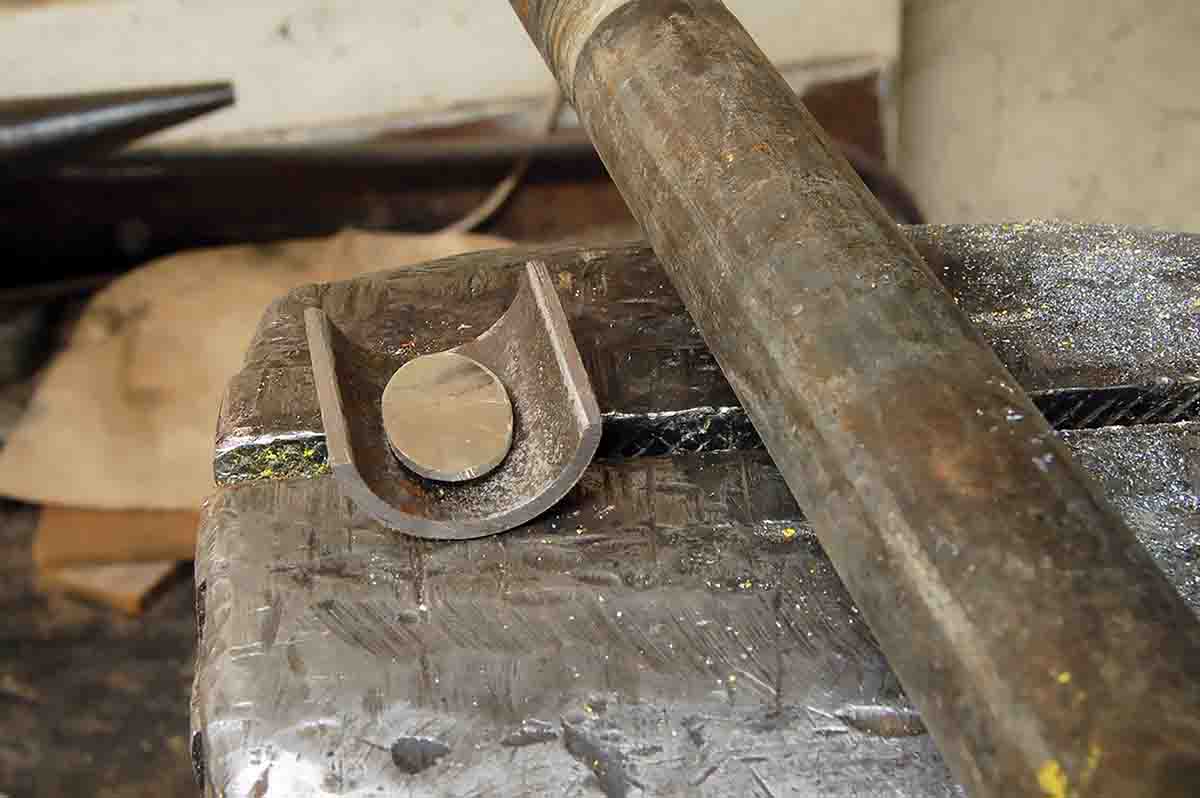
The answer is to cut a 2-inch length of a ¾-inch inside diameter steel pipe. Polish the inside of the pipe very smooth, then cut it in half lengthwise. A photo shows this clearly. A piece of ¾-inch rod, or even a ¾-inch diameter bolt, will fit the short piece of pipe perfectly. Drop the inlay in the piece of pipe as shown, put the ¾-inch rod on top and tape the parts together so they can be handled. Squeezing the assembly in a vise now bends the relatively soft inlay. This amount of bend fits most all stocks except for a few very thin European examples. Now the inlay can be fit into the wood.
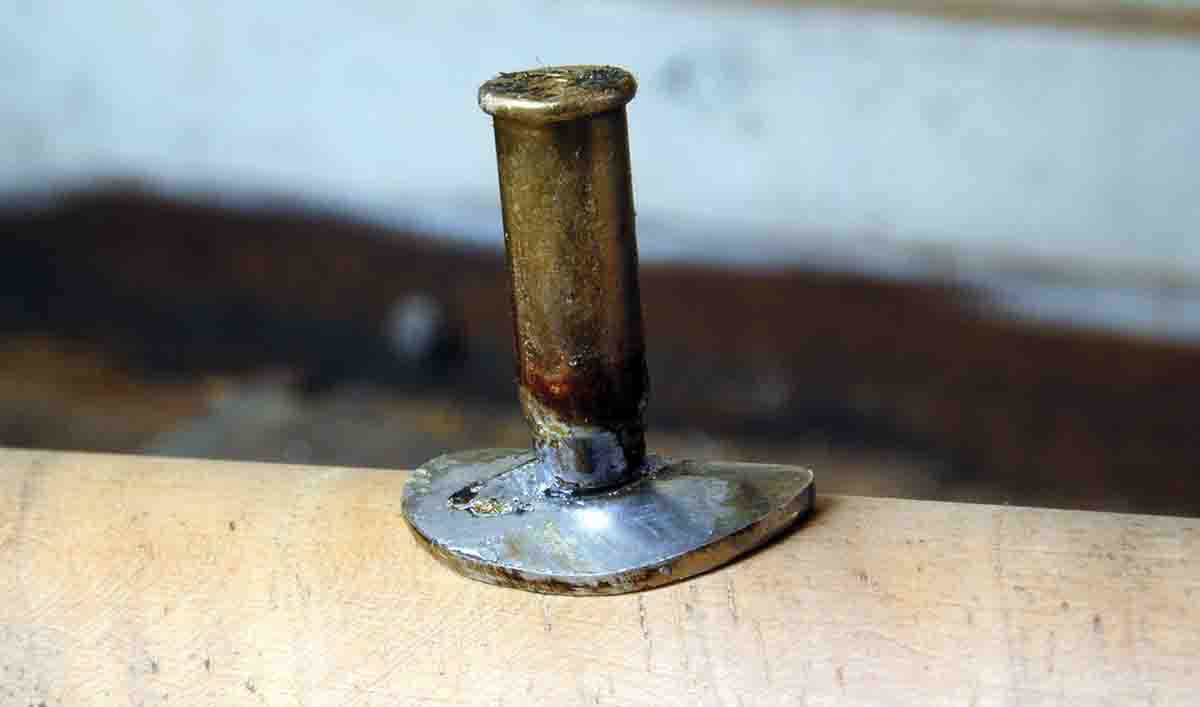
To hold the ellipse while inletting, simply solder on a handle.
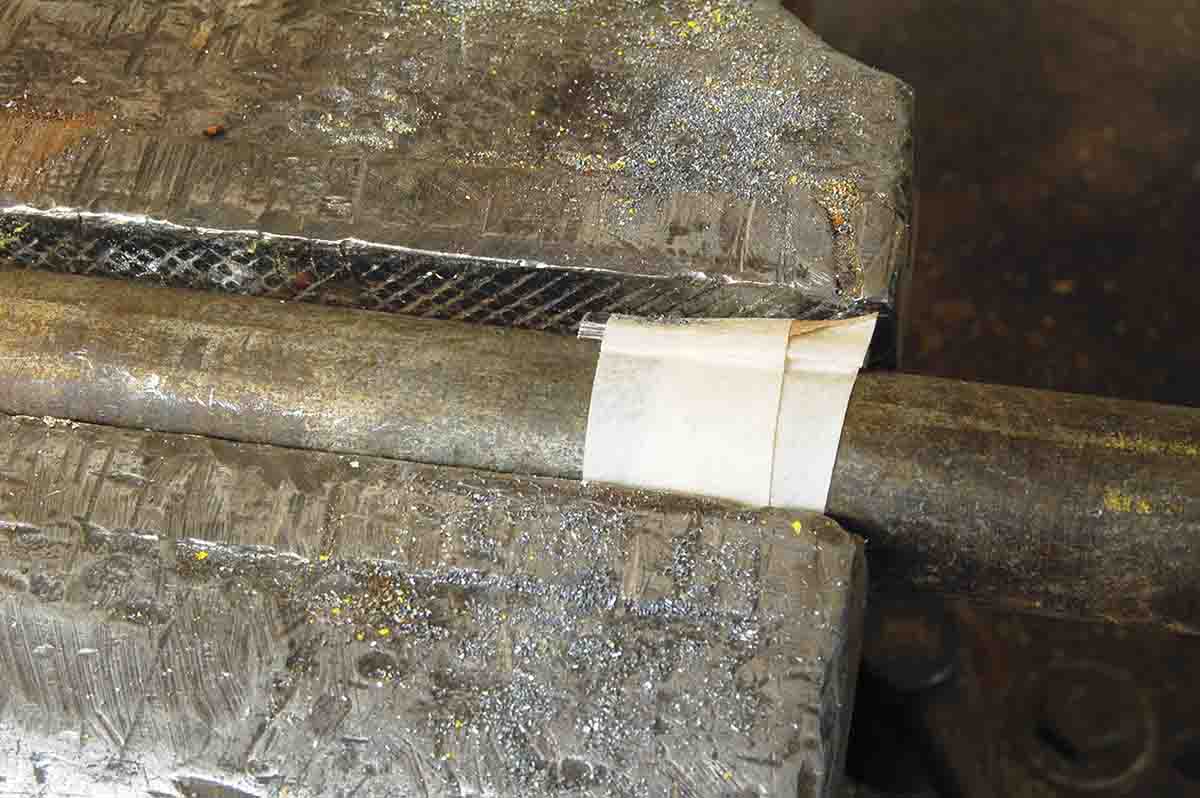
Suddenly, another problem arises: How is the inlay held while fitting it? Just attach a handle! German silver solders easily so a .17 rimfire case was soldered on. That should do it.
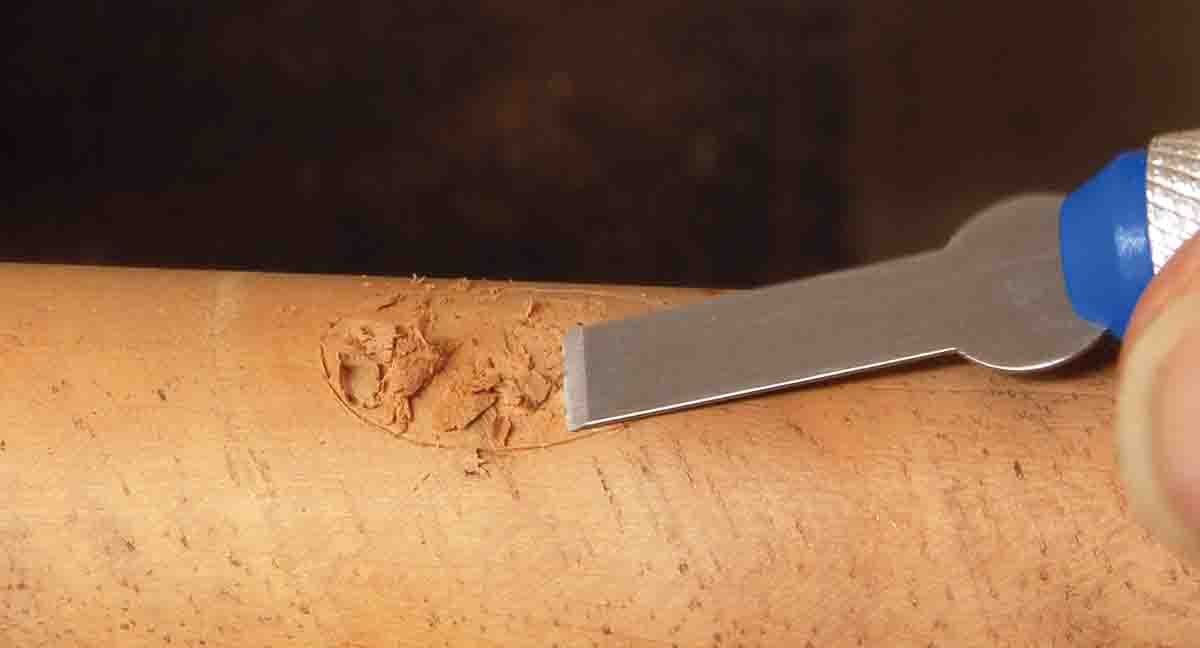
Carefully cut around the ellipse with a hobby knife, and remove enough wood to sit the inlay flush with the surface.
The inlay can now be moved around until it is in exactly the right place, then make a cut around it with a small hobby knife. A chisel is used to cut to the outline around the edge, then a little rotary power tool removes the wood in the center. Work continues until the inlay is flush with the wood surface or just a tiny bit below.
Heating the inlay to remove the “handle” and wiping off the solder is done next, but don’t put the solder away just yet. Even though the inlay will be surrounded by Brownells Acraglas epoxy, which penetrates the wood grain where possible and prevents swelling and shrinking, a physical anchor is still required. At one time, I used 22-gauge copper wire soldered to the bottom of the inlays, then cut them to about a quarter-inch long. A hole was drilled for it and when filled with epoxy when installing the inlay, I never had any come loose. However, a couple of years ago, a friend gave me a handful of quarter-inch long brass, flat head wood screws. When soldered to the underside of any ellipse or shield inlay, they make the perfect anchor.
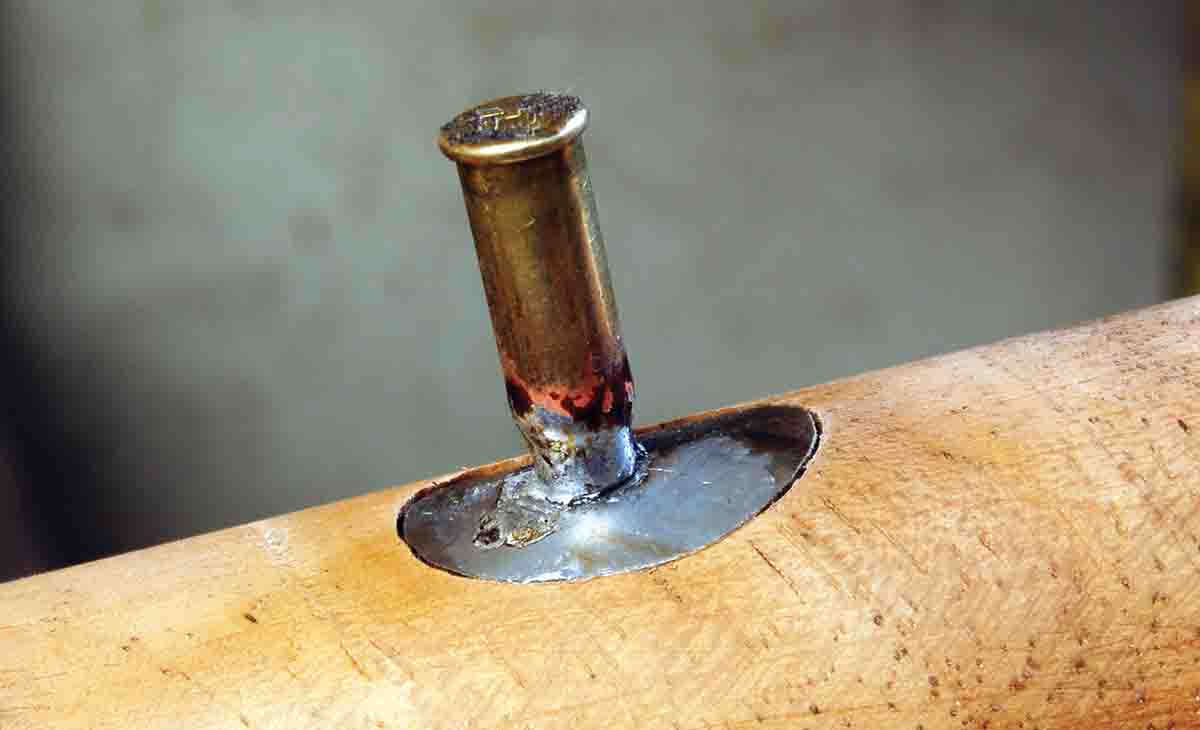
When the inlay is down far enough, remove the handle and epoxy it in place.
Unfortunately, the stock with the inlay shown being installed could not be refinished in time for photos. The stock shown with the plate having initials was completed a few years back.
All in all, the silver initial plate, whether ellipse or more complex shield, adds a touch of class to wood-stocked rifles. This is especially true if the stock is checkered and has a bit of figure. It can also make sales or trades easier as it is a seldom seen feature that subtly says, “custom work.” Perhaps something worth thinking about when doing the next refinishing job.
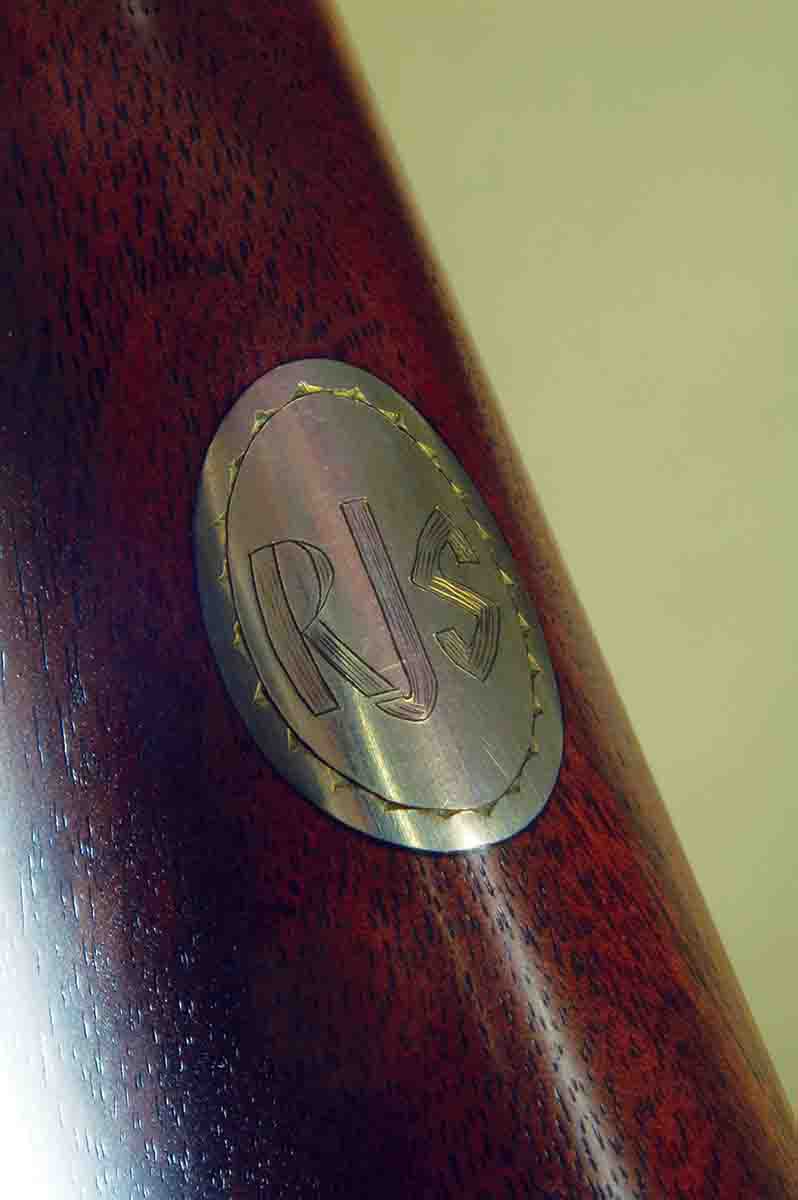
A finished and engraved ellipse on a Browning.